« Tips for Fault Diagnosis »
It’s a nightmare for every musician: the amp is roaring perfectly one moment, and the next second, it’s silent. But don’t panic! If there are tube amp problems, the cause of the problem can often be identified independently. This requires a systematic and step-by-step approach. Many minor amplifier defects can also be fixed in a do-it-yourself manner. However, for some signs of wear and damage, a visit to a technician is unavoidable. In this article, we explain how to diagnose typical amplifier defects and when it’s advisable to seek professional help.
Attention
Caution should always be exercised when working on tube amps.
If you are unsure which components can be touched or replaced safely and/or are not familiar with measuring devices, it is strongly recommended to consult a professional when dealing with technical defects.

Fault Diagnosis – What is the real issue?
If the amp remains silent, there’s no need to panic. Often, it’s just minor signs of wear. The cause may also lie in other parts of the signal chain that are not built into the amp. For example, additional guitar equipment is often much more sensitive than the tube amplifier. In diagnosis, it has proven useful to follow the signal path. In other words, start by checking where the signal comes from (e.g., guitar) and end where the signal is reproduced (e.g., speaker). The fault diagnosis can be performed using the following steps.

Step 1: Exclude other sources of interference!
To ensure that the defect is indeed in the amplifier and not in the guitar, cables, or effect devices, the amplifier should be isolated as much as possible. This means disconnecting all unnecessary accessories: wireless receivers, effect devices, power soaks, equalizers, and the like should be excluded as potential sources of interference. For testing, the setup in a cabinet set-up should look like this: Guitar – Guitar cable – Amp – Speaker cable – Speaker. The power supply should also be correspondingly simple. Ideally, connect the amplifier to its own outlet with a simple power cable.

Step 2: Trace the signal along the chain
Once the test setup is established, all components should be tested individually. Start with the instrument – it’s ideal to have another guitar on hand. This way, you can check if the problem is with a damaged instrument. If the guitar is ruled out as the source of the problem, the next step is to test the instrument cable, then the speaker cable, then the speakers themselves. Finally, check the power supply. If the problem persists with all combinations, the likelihood is very high that it’s a tube amplifier problem.

Recognizing a typical tube amplifier problem
Once it’s established that the fault originates in the amp, the next task is to find out which component is causing the problem. While the tube amplifier consists of numerous components, most parts fortunately exhibit very characteristic symptoms in the event of a fault. We present the most common problems and signs.
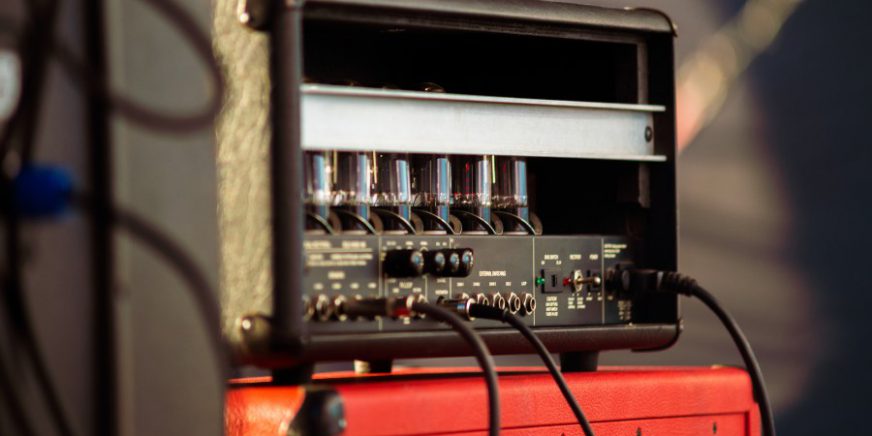
How to recognize faulty tubes?
Of course, when the amp is causing issues, it’s never wrong to take a look at the amplifier tubes. But how do you recognize faulty valves? Basically, there are different types of tube faults: mechanically damaged tubes, externally undamaged but non-functioning electron tubes, and aging valves. Some faults can be quickly identified: a mechanically damaged valve cannot function anymore; its vacuum is no longer intact. Mechanical damage to the glass envelope, electrodes, or the socket can usually be recognized at first glance.

Completely non-functioning tubes are straightforward to discover: if the amp is on, and all tubes except one are glowing happily, the culprit is quickly identified. It gets more complicated when all tubes are running, but due to their natural aging, they slowly lose power. Aging is a normal process in electron valves that can be slowed down by careful handling but never stopped. Once a valve is nearing its natural end, various problems can arise.

Microphony due to aging tubes
If the amp produces a series of nasty feedback cascades, an overaged or poorly/not selectively selected tube may be to blame. The tubes can quickly bring feedback during play, and reducing the guitar volume does not solve the problem.
To identify the relevant tube, the familiar tapping test is the most reliable: a non-conductive rod (e.g., a pencil) is gently tapped on the tubes during operation. Ideally, only a dull “thud” should be heard. If the tapped valve is prone to microphony, a clearly audible feedback sound will occur during the tapping test.
Recommendation: The TAD Premium Tubes
Preamp or power amp?
If the amp is simply not producing any sound, even though all tubes seem to be running, the position of the faulty valve can also be determined using the effects loop – if available.
If the problem disappears when the guitar is plugged directly into the effects return (the signal will be faint but audible), the defective electron tube is in the preamp. But if the problem persists, the power amp tubes should be replaced.
Tube Replacement
Once the defective electron tube is identified, it’s time to replace it. Valve replacement is usually unproblematic. After selecting the suitable tube, disconnect the amp from the power source, open the cover, and remove the electron tube from its socket. Then, simply insert the new electron valve and secure it with the provided retaining clip.
But beware! Depending on the amplifier model, the bias current must be observed. If a bias adjustment is necessary for the power amp valves, we recommend having it done by a professional. Here too, we recommend the TAD Premium Selected tubes. Due to the printed measurement values, valves can easily be replaced individually with matching tubes with corresponding measurement values if a defect occurs.

Scratching, noise, and crackling – the usual suspects
Defects and signs of wear often occur in potentiometers, connectors, or contacts. In most cases, this type of defect can be diagnosed quite easily. Typically, the fault only occurs when a potentiometer is moved, a plug is touched, or a fader is used. The most common cause of this type of defect in the tube amplifier is corroded contacts. Fortunately, potentiometers and contacts can be cleaned and restored to working condition very well with suitable contact care products. If necessary, and with a little soldering experience, this tube amplifier problem can also be quickly repaired.
 5% solution, 182ml")
To test the different components, it helps to check the individual segments of the amp: turn each potentiometer one after the other, use all faders, and also check the plug connections to find the amp defect.
Output transformer, power supply, capacitors
If all testing and trying doesn’t help, and the amp remains silent, a complicated defect is most likely present, requiring professional assistance. Working on the live elements of an amp is only advisable if the use of measuring devices is mastered securely, and the functioning of the individual parts is known.
Even if the tube amp problem can be clearly traced back to a specific amplifier component, the replacement is often complicated: suitable amplifier spare parts must be found, and the faulty components must be removed. The connection of new components is often only possible with the help of a suitable circuit diagram. Reading and understanding this requires a considerable amount of expertise in the field of electrical engineering. In short, only those who are really well-versed in the subject should attempt to replace power supplies, transformers, or capacitors.

Tube Amplifier Problems – Rely on the Professional in Case of Doubt
A tube amplifier malfunction can easily cause despair for a musician. However, in most cases, most problems can be solved quickly and easily. Thorough fault analysis is important, as well as knowing which components can be replaced by laypeople in the field of electrical engineering. Repairing a tube amplifier should only be attempted if the technical functions are well understood, and the necessary equipment is available. And even then, safety regulations must be strictly observed! If a complicated defect is present or if you don’t trust yourself to repair it, it’s always better to rely on the professional repair service. We are always happy to help you fix your tube amplifier defect, so you can make some noise again quickly.
______________________________________________________________________________________________________________________________
Image sources:
Featured image: © dizfoto1973 – stock.adobe.com
Various tools of an electrician: © Africa Studio – stock.adobe.com
Two electric guitars: © WujuPlanet – stock.adobe.com
Electron tubes, close-up: © simone_n – stock.adobe.com
Someone changing the tube in the amplifier: © kustvideo – stock.adobe.com”